How To Reset Your Apple ID
7 years ago by Nigel Kags and 1189259 Views
With Apple being one of the most widely used mobile device operating systems, we have focused on how to reset your Apple ID. You don’t need to be a computer expert to reset your Apple ID.
By the end of this tutorial, you will be able to reset your Apple ID to something that you can easily remember.
Let’s get right into it.
Resetting your Apple ID is very simple & easy to do. It is important to know how to do this as every Apple device owner uses their Apple ID for almost everything. For example, signing into iCloud, purchasing an app, shopping in iTunes and much more.
If you have forgotten your Apple ID and you are struggling to remember it, allow us to guide you through the simplest steps to solve your problem.
NB. Try to sign in with all your previously used email addresses. This is done as your email address usually your Apple ID.
Finding Your Apple ID
Step 1 – Visit the Apple ID homepage
First visit the website, appleid.apple.com to begin. Click “Forgot Apple ID or password?”

Step 2 – Click the Look it up link
If you did not remember your Apple ID, click the “look it up” link which will help you retrieve it.

Step 3 – Enter your credentials
Enter the required information about yourself that is needed to find your Apple ID. Click Continue to go to the next page.

Step 4 – Finally, forgotten Apple ID displayed
After clicking Continue, your forgotten Apple ID is displayed. Click the “Go to Your Account” button to proceed resetting your Apple ID.

Resetting Your Apple ID
Step 1 – Visit the Apple ID homepage
Visit appleid.apple.com to sign in. Enter the required information in the fields and click the “Enter” arrow.

Step 2 – Verification process
A verification code will be sent to your Apple devices. In the 1st screen read the note and press the “Allow” button. In the 2nd screen, click “OK” only after entering the verification code.


Step 3 – Enter verification code
Enter the verification code in the spaces displayed and it will automatically verify the code then take you to the next page.

Step 4 – Terms & conditions
An “Apple ID & Privacy” pop-up is displayed if this is your first time accessing your Apple ID account. After reading the pop-up, click the Continue button to gain access to your Apple account.

Step 5 – Edit your account
Under the Account section, click “Edit” to change any information under that section.

Step 6 – Change your Apple ID
Click the link “Change Apple ID…” to make the preferred changes.

Step 7 – Enter new email address
Enter the new email address that you want to use as your new Apple ID. Click the continue button.

Step 8 – Email with verification code
An email with a verification code will be sent to the new email address that you entered.
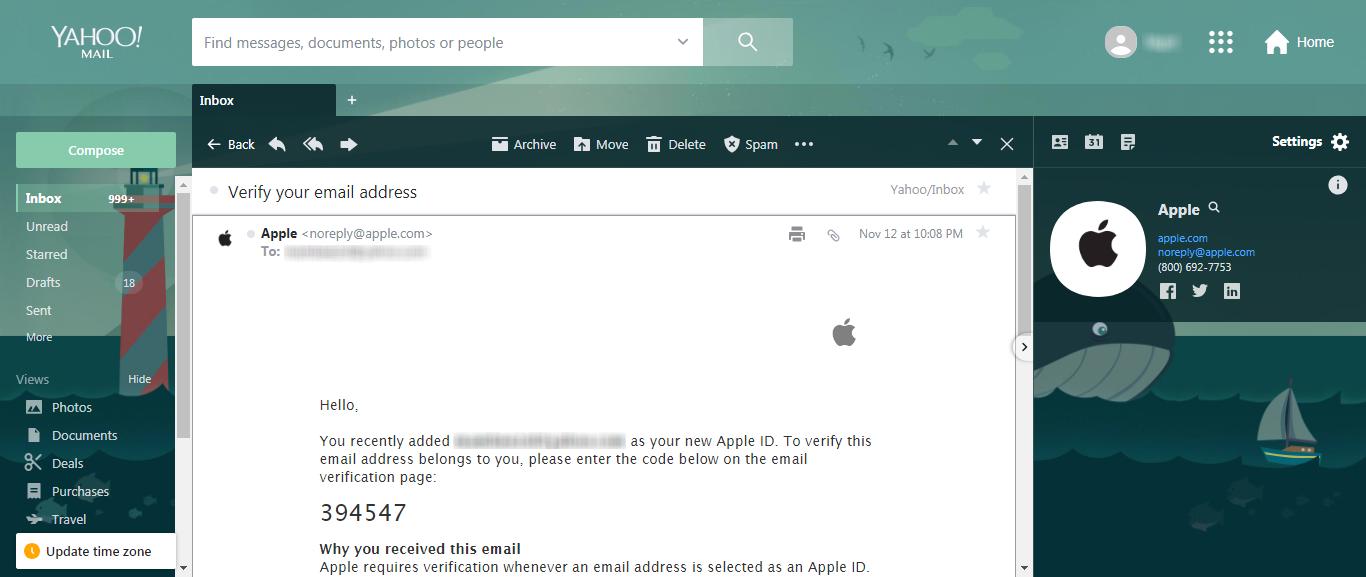
Step 9 – Enter verification code
Enter the verification code that is sent to you via email. Click the continue button.

Step 10 – Complete the process
Click the Done button to complete the process of resetting your Apple ID.

Step 11 – Finally, proceed to Sign Out
Proceed to click the Sign Out button.

And that’s it!